


Table of Contents
Facebook recently announced changes to the platform that mean you need to be paying better attention to the back end of your website if you want people to share your content. From here on out if you don’t specify the Facebook Open Graph metadata on each page of your website, you won’t be able to get Facebook to show the right image for your post and it will pull whatever info it can find. If it doesn’t look good, people may choose not to share it. Open Graph is simply a system set up by Facebook to enable communications with a website. In the absence of Open Graph tags, Facebook looks at other data.
If you’re using WordPress for your website or blog, there are a variety of plugins you can install to help you manage the Facebook Open Graph metadata. Here are two of my favourites and the steps to use each one.
Using YOAST SEO Plugin to Choose Facebook Image
YOAST SEO is one of the most useful and most common Facebook plugins. I highly recommend it for managing what Google sees and shows to searchers. It also can help you communicate with Facebook and Twitter about which images and information to show there. On the screen where you compose your blog, below the compose window, you should see something like this:


Click here to learn more about how to use the Focus Keyword and Snippet features. Today we’re focusing on the social tab. Click on the three connected dots on the left.
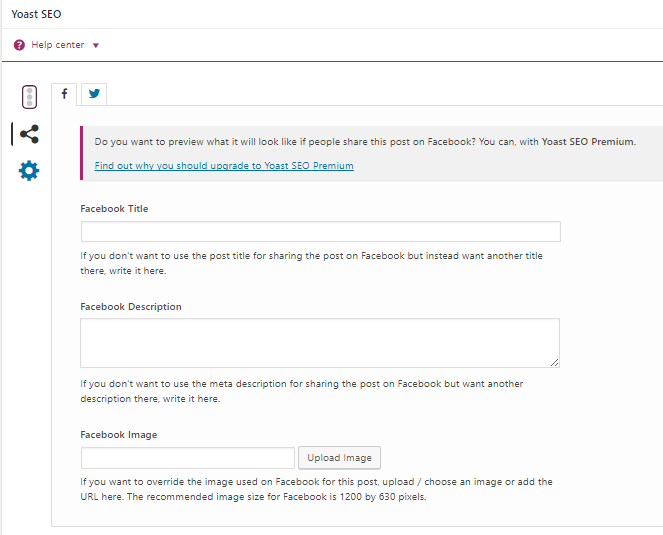
Communicating with Facebook is as easy as adding information to these three boxes!
- Facebook Title – The “headline” that will appear directly under your image.
- Facebook Description – The extra info, perhaps a short introduction to entice readers to click on the link.
- Facebook Image – The image you want Facebook to show any time someone shares the link to this page on Facebook. NOTE: This image should be 1200 x 628 pixels to fit perfectly!
At the top of this box you’ll see a Twitter tab. You can customize the same three boxes for Twitter, if you want something different to appear for your Twitter audience. The optimal image size for the Twitter image is 1024 x 512 pixels, but you can often get away with using the Facebook image.
Now when you, or anyone else, share(s) the link to this page, Facebook will use the image you’ve designated. No more blank images. No more empty headers, or headlines full of nonsensical keywords.
Using Social Warfare Plugin to Choose Facebook Image
Another awesome option for managing Facebook Open Graph metadata is the Social Warfare plugin. Some of the features are duplicated in YOAST SEO, but each of these plugins has much to offer that the other does not. I use both plugins on this website and I have the paid (Pro) version of Social Warfare (aff). Social Warfare does not manage your page keywords, Google snippet and SEO score as YOAST does and is known for. Social Warfare does, however, offer Pinterest control and the ability to craft the tweet your readers will share when they click the button to share on Twitter.
To communicate with Facebook, you’ll scroll below your blog compose window and look for this:

What Does a Properly Open Graphed Link Look Like on Facebook?
What you want to avoid is this:

Notice there is no image attached to the link and I didn’t have the option to add a link image. If I add a photo in the above example, I would lose the link preview box. There is also no description or introduction to entice me to click on the link. What you really want is something more like this:

The designated image is used, and it’s the proper size so it didn’t get cropped off! The blog title is pulled in as the headline, but I could have written a new one. There is a brief introduction to entice readers to click through to the article.
What if Facebook Still Doesn’t Pull the Right Image?
Sometimes you go through all this and head back to Facebook to confirm your work and BLARGH, Facebook is still showing the wrong image. I find this happens a lot with third party apps that help you manage contests on Facebook. If this happens to you, don’t panic! You probably did it right and you may simply need to prod Facebook to have another look. Facebook even gave us a way to do this! Here’s how to use the Facebook Debugger:
- Open a new window and visit https://developers.facebook.com/tools/debug/.
- Paste the link to your blog post into the Sharing Debugger window and click “Debug”.
- Scroll down to the Link Preview box. If the info and image are incorrect, scroll back up a few lines and click “Scrape Again”.
- Check the Link Preview box again. If you’ve input the images and info correctly, it should now show here.
Now off you go! From here on you need to be adding the Open Graph metadata to each and every post and page on your website, and you’ll want to slowly go back and add it for all of your old posts, too, because you are recycling those old posts, right?

